Using SLURM
Introduction
One of the main purposes of the dragon cluster is to accommodate
especially long-running programs. Users who run long jobs (which take
hours or days to run) will need to run these jobs through the SLURM
scheduler. SLURM provides a method for handling these jobs on a first-come
first-served basis with additional fairshare policy so all users can have
their jobs started in some reasonable time. In this manner, all jobs will
run more efficiently and finish quicker since each is allowed to have all
system resources for the duration of its run. All SLURM jobs must be
launched from the dragon job submission server.
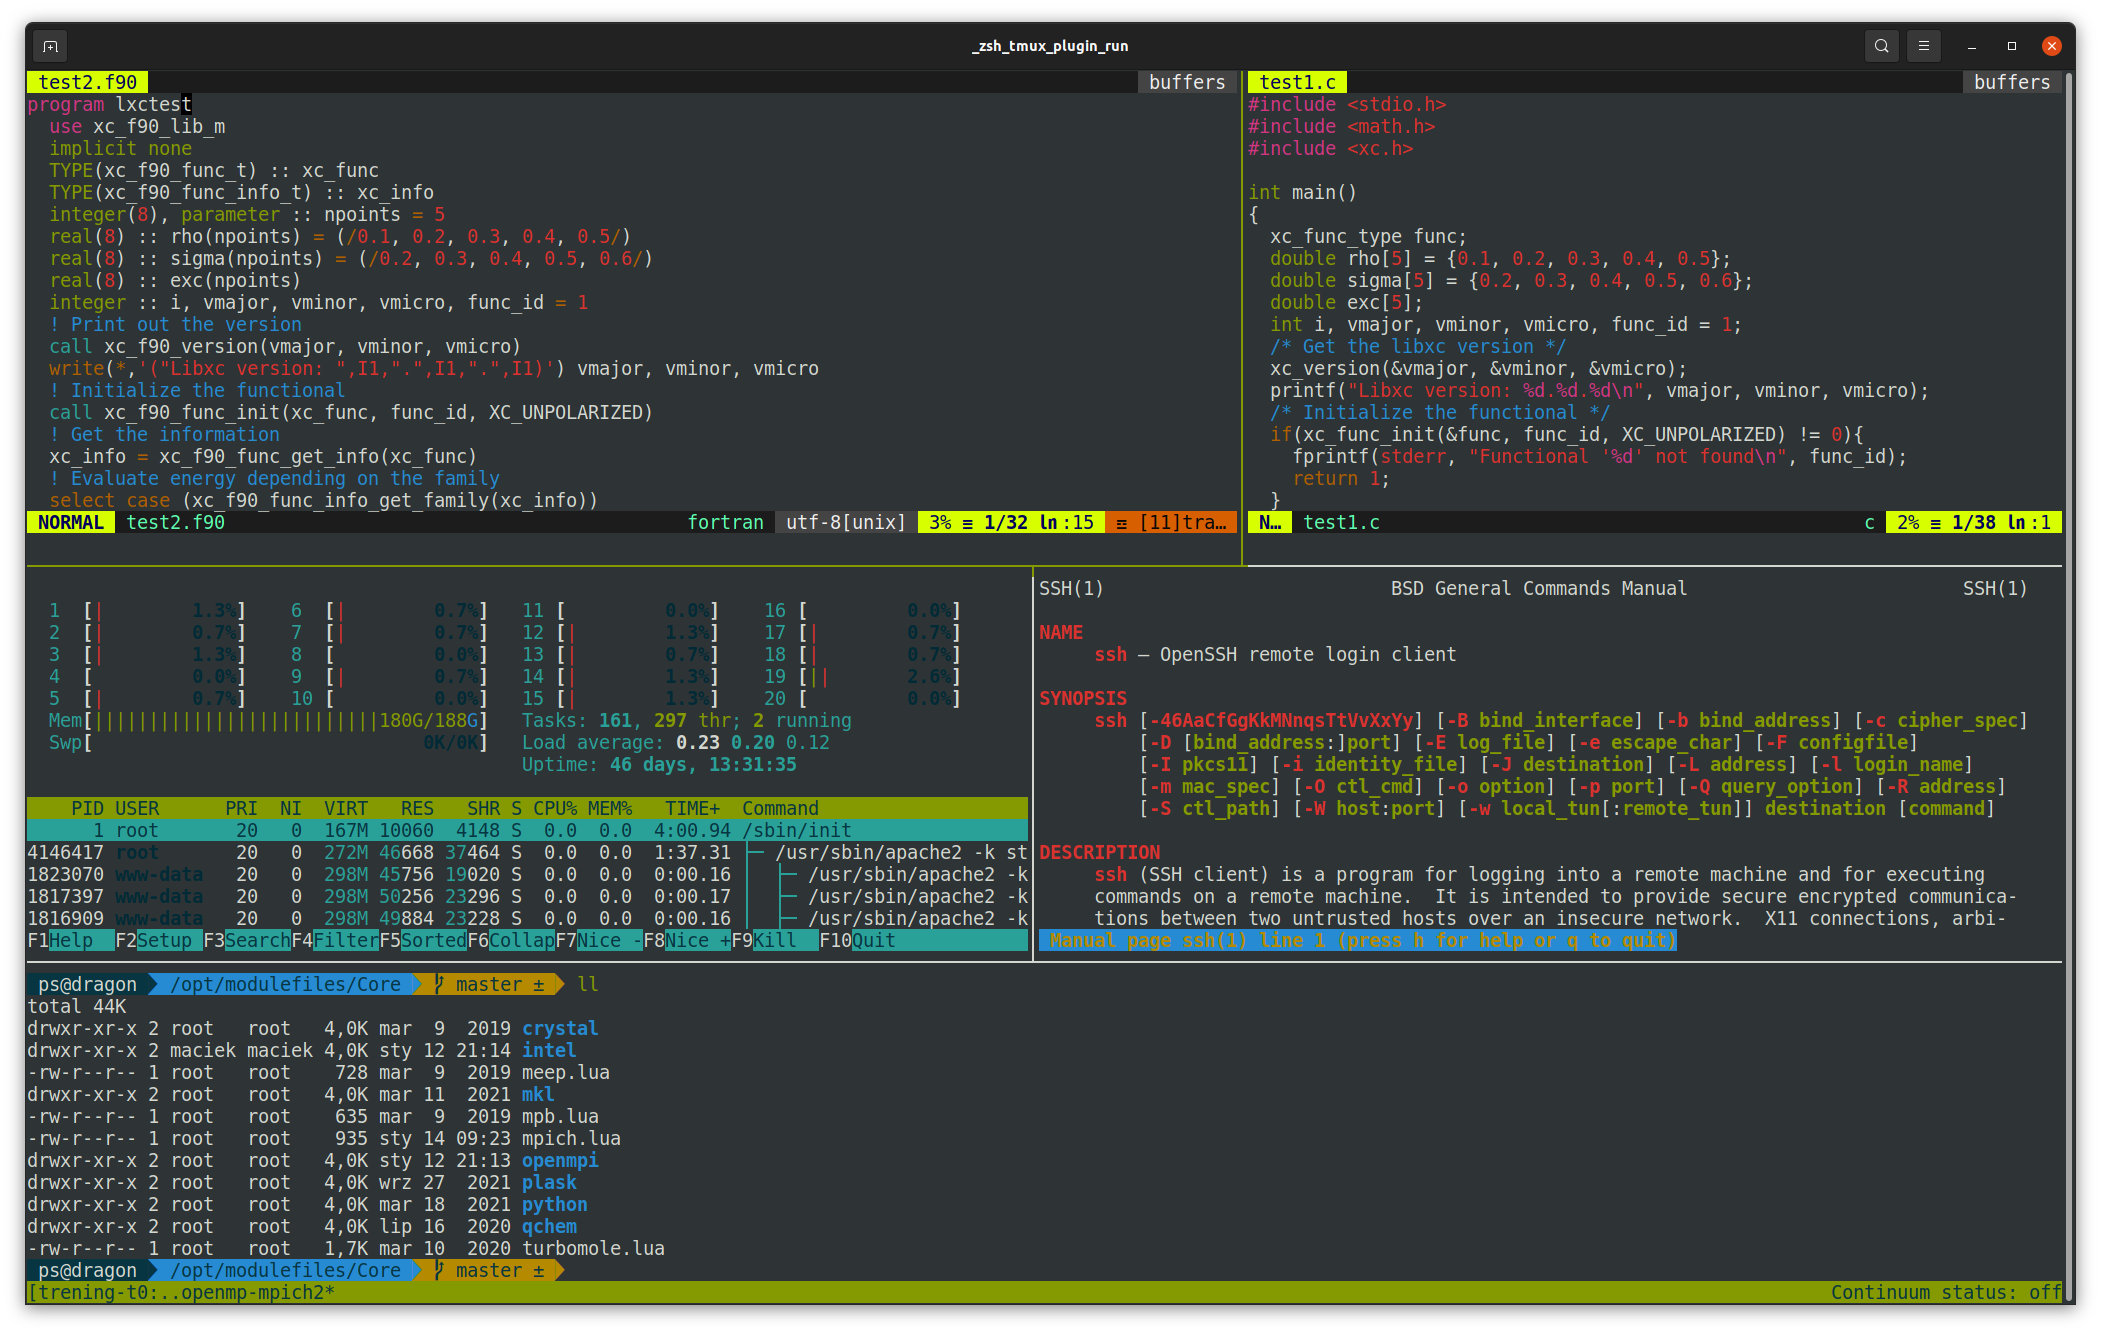
Fig 1: Sample ssh terminal session shows tmux multi window possibilities
and zsh customizable prompt.
How to Log-in
You can log-in into dragon or copy your files using SSH protocol.
The useful programs for connection are PuTTY and WinSCP on Windows
or ssh and scp commands on Linux. Please refer to their manual for
instructions how to use them. The address of the cluster is
dragon.phys.p.lodz.pl. You should use a non-standard port 6010.
For login you should use the username and password that have been provided
to you. After the first login it is recommended to change your password
using passwd command. You may put all your files in your home directory.
They will be accessible from all the computing nodes through cluster’s
internal network filesystem.
Warning
Use port 6010 (instead of the default) for SSH connection to the cluster.
Running Jobs
Please do not run application programs directly from the command-line when you connect to the cluster. Doing so may slow down performance for other users and your commands will be automatically throttled or terminated. To better understand how applications get submitted as jobs, let’s review the difference between login nodes and compute nodes.
Login Node
When you connect to the cluster, you are connected to a single shared computer with all your fellow users, known as the “login node”. The purpose of the “login” node is for you to submit jobs, copy data, edit programs, etc. You must not launch any computations on this computer directly.
Compute Nodes
These computers do the heavy lifting of running your programs. However you do not directly interact with compute nodes. You ask for the scheduler for compute nodes to run your application program using SLURM, and then SLURM will find available compute nodes and run your application program on them.
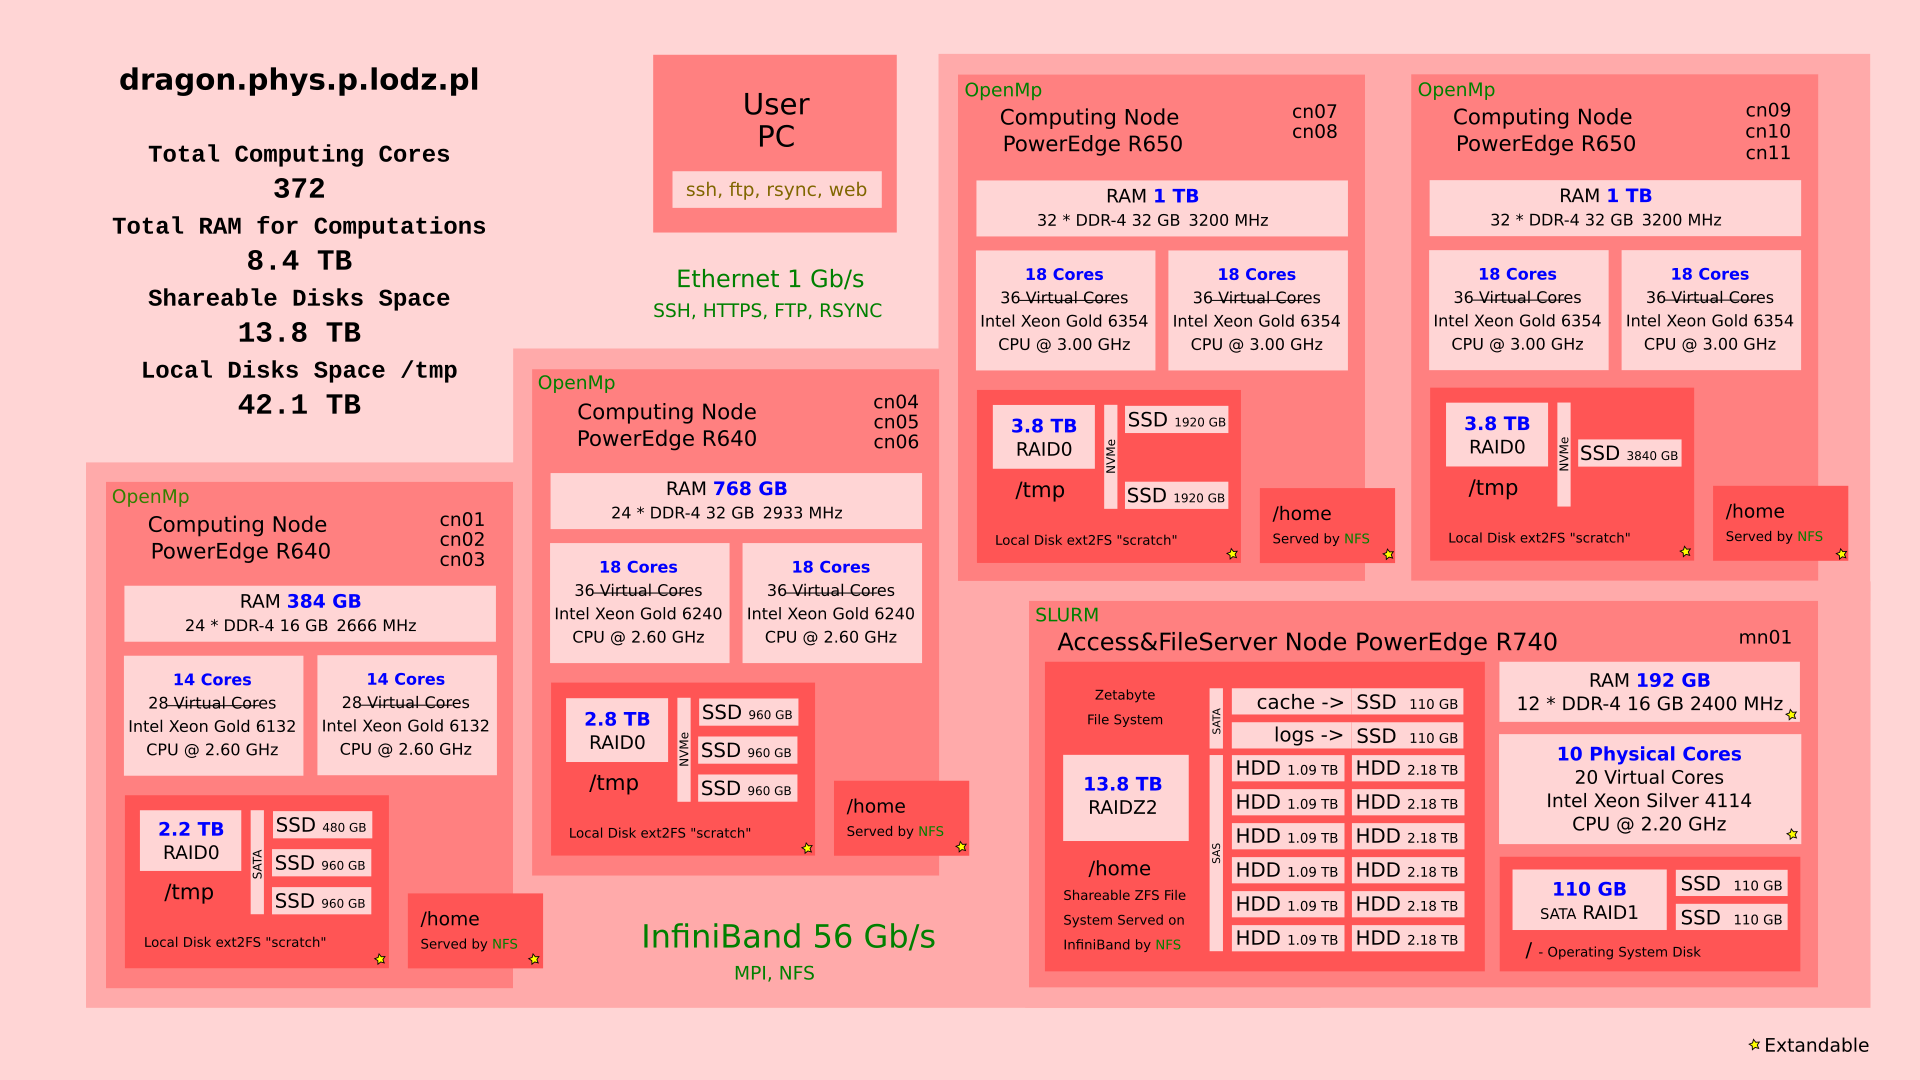
Fig 2: Dragon’s organization details.
Computing Resources
An HPC cluster is made up of a number of compute nodes, each with a complement of processors, memory, and (possibly in some future) GPUs. You submit jobs that specify the application(s) you want to run along with a description of the computing resources needed to run the application(s).
You may submit both serial and parallel jobs. A serial job is executed on a single node using exactly one CPU. Parallel jobs can either share the memory on a single node or run as separate tasks communicating with each other. In order to choose a desired type of your job, you need to specify the number of tasks and the number of CPUs per each tasks. The table below summarizes the possible types of jobs.
Job type |
Number of tasks |
Number of CPUs/task |
|---|---|---|
Serial |
1 |
1 |
Shared parallel (e.g. OpenMP) |
1 |
2–36 |
Separate parallel (e.g. MPI) |
2–108 |
1–54 |
Note that the number of tasks multiplied by the number of CPUs per task may
not exceed 108, unless you submit your job in the free QOS.
In addition, for the dragon there is more granularity in available resources.
Each user have a possibility to use up to 3240G of RAM and resources are depending
from queue used as specified in table bellow.
Name |
Priority |
Preempt Mode |
Grp TRES |
Max Tres |
MaxTRES PerNode |
MaxTRESPU |
MaxWall |
|---|---|---|---|---|---|---|---|
normal |
5 |
cluster |
cpu=108 |
10-00:00:00 |
|||
tiny |
20 |
cluster |
node=1 |
cpu=4, mem=5G |
01:00:00 |
||
urgent |
100 |
cluster |
cpu=72 |
cpu=36, mem=1T |
2-00:00:00 |
||
long |
3 |
cluster |
cpu=72 |
cpu=36, mem=1T, node=2 |
28-00:00:00 |
||
free |
0 |
requeue |
The Batch Scheduler and Resource Manager
The batch scheduler and resource manager work together to run jobs on an HPC cluster. The batch scheduler, sometimes called a workload manager, is responsible for finding and allocating the resources that fulfill the job’s request at the soonest available time. When a job is scheduled to run, the scheduler instructs the resource manager to launch the application(s) across the job’s allocated resources. This is also known as “running the job”.
You can specify conditions for scheduling the job. One condition is the completion (successful or unsuccessful) of an earlier submitted job. Other conditions include the availability of a specific license or access to a specific file system.
Batch Jobs
To submit a batch script to SLURM, you need to use the sbatch command. It
is designed to reject the job at submission time if it requests resources that
cannot be provided as specified. This gives you the opportunity to examine the
job request and resubmit it with the necessary corrections.
Interactive Jobs
An interactive job is a job that returns a command line prompt (instead of
running a script) when the job runs. Use salloc command to submit an
interactive job to SLURM. When the requested resources are allocated,
a command line prompt will appear and the you can launch your application(s)
using the srun command.
The following example requests a node for one task, and allocates 2GB RAM and
4 CPUs for an interactive job that is allowed to last one hour. Then a sample
command launching your_application on the allocated node is shown:
user@dragon:~$ salloc --time=1:00:00 --mem=2G -n1 -c4
salloc: Granted job allocation 1234
[1234] user@dragon:~$ srun your_application
Anatomy of a Batch Job
A batch job requests computing resources and specifies the application(s) to launch on those resources along with any input data/options and output directives. You submit the job, usually in the form of a batch job script, to the batch scheduler. This is the preferred way of using the cluster.
The batch job script is composed of four main components:
The interpreter used to execute the script
#SBATCHdirectives that convey default submission options.The setting of environment variables and the modules (if necessary).
The application(s) to execute along with its input arguments and options.
Here is an example of a batch script that requests 8 task on two nodes,
allocating altogether 2GB RAM on each node and is allowed to run for 1 hour.
It is assigned to the QOS normal. When the job is launched, it loads
environmental module my_module and launches the requested
tasks of my_application on the allocated nodes:
#!/bin/bash
#SBATCH -n 8 -N 2
#SBATCH --time=1:00:00
#SBATCH --mem=2G
#SBATCH --qos=normal
module add my_module
srun my_application
When the job is scheduled to run, the resource manager will execute the batch
job script on the first allocated node. The srun command will launch
additional requested tasks on all the allocated nodes.
The specific instruction how to launch available programs, are presented elsewhere.
Resources Specification
On the cluster you must manually specify requested resources. Should you
forget to do this, your job will be allocated 1KB RAM and will be allowed
to run for 1 minute. You specify the resources as command-line arguments
to sbatch or salloc or in the #SBATCH directive of your script.
The basic resources are as follows:
Long (short) option |
Resource type |
|---|---|
|
Total run time of the job. Your job will be killed once this time elapses. |
|
Memory required for all tasks on each node. The amount for RAM for each task depends on the number of tasks assigned to a single node. |
|
Memory required per allocated CPU. Each task
will be given the specified amount of RAM
multiplied by the number of CPUs per task. This
option and |
|
Maximum number of tasks allowed to run for this
job simultaneously. The tasks themselves are run
with the |
|
Number of CPUs per single task. Default is one.
Increase this number for shared-memory parallel
jobs. By default SLURM sets |
|
Number of distinct nodes allocated to your job.
In general you should avoid specifying this
option. Set |
When submitting your jobs you should carefully consider required resources. Specifying too low values puts your job at risk of being terminated and setting it too high wastes cluster resources and decreases priority of your job. Furthermore, small jobs can be launched earlier in order to fill-in the holes is cluster resources, using backfill algorithm.
How to Estimate How Much Memory My Batch Job Needs?
It is difficult to estimate beforehand the exact needs for jobs. Usually the best thing you can do is to use information from similar previous completed jobs. The following command will print a summary of requested and used resources for both running and finished batch jobs:
$ seff JOBID
The output of this command looks like this:
$ seff 1592
Job ID: 1592
Cluster: dragon
User/Group: user/user
State: COMPLETED (exit code 0)
Cores: 48
Nodes: 4 (12 cores per node)
Tasks: 24 (2 cores per task)
Elapsed Time: 00:08:02
CPU Utilized: 04:36:28
CPU Efficiency: 71.70% of 06:25:36 core-walltime
Max Memory Utilized: 2.74 GB (up to 934.75 MB/node)
Memory Efficiency: 68.46% of 4.00 GB (1.00 GB/node)
You can find the total elapsed time of your job and the memory used. Set the
--time option of your new job to the value slightly higher than the
visible one (--time=10:00 i.e 10 minutes would be reasonable in the above
example). Similarly you can estimate the required memory. Note, however, that
for multi-task job you cannot know how many nodes will be allocated for your
job unless you explicitly specify this. So, it may be more reasonable to
require memory per CPU instead of a node. In the above example, the job used
2.74 GB or RAM for 48 cores (58 MB per core). Hence, it would be quite
reasonable to require --mem-per-cpu=64MB.
Another important output of the seff command is the CPU efficiency. If
its value is low, it means that you have required too many CPUs. Try
decreasing number of CPUs per task or number of tasks to keep the efficiency
as close to 100% as possible.
Remember that the new job might have different needs. If you estimate the required time too big, your job might need to queue longer than necessary, but no resources will be wasted. Here the big difference (queuing wise) is wether the job is less than 3 days or more. Longer jobs queue longer.
If you estimate the memory needs much too big, then resources will likely be wasted. This is because if your job uses only 4 cores but all the memory in node, then no other jobs fit in that node and all the remaining cores will be idle.
Note, that if your job NEEDS the memory, then it is perfectly ok to reserve all the memory in the node, but please don’t reserve that “just in case” or because you don’t have any idea how much the job needs. You can get an estimate from similar previous jobs, and you can query that information with the command shown above. You just need the SLURM jobid for those jobs. If you don’t know them, there are commands for searching them as well.
Job Names and Output Files
All jobs are given both a job identifier and a name, for easier identification
in the batch-system. The default name given to a job is the file name of
the submit script, which can make it difficult to identify your job, if you use
a standard name for your submit scripts. You can give your job a name from inside
the script by using the -J option:
#SBATCH -J parameterTest
This will name your job “parameterTest”.
By default — for jobs submitted with sbatch — the output which your job writes
to stdout and stderr is written to a file named slurm_%j.out. The %j
in the file name will be replaced by the job number SLURM assigns to your job.
This ensures that the output file from your job is unique and different jobs
do not interfere with each other’s output file.
In many cases the default file name is not convenient. You might want to have
a file name which is more descriptive of the job that is actually running — you
might even want to include important meta-data, such as physical parameters, into
the output filename(s). This can be achieved by using the -o and -e options
of sbatch. The -o option specifies the file containing the stdout and
the -e option the file containing the stderr. It is good practice to include
the %j string into the filenames. That will prevent jobs from overwriting
each other’s output files. The following gives an example:
#SBATCH -o calcflow-%j.out
#SBATCH -e calcflow-%j.err
You can give the same filename for both options to get stdout and stderr written
to the same file. Also if you simply skip the -e option, the stderr will be
written to the same file as the stdout.
If you use job arrays, you may replace the job identifier %j mark with %a,
which gives the whole-array identifier and %A for the array element number:
#SBATCH -o myarray-%a_%A.out
Partitions
SLURM jobs are executed on compute nodes. Amount and types of resources (CPUs, Memory, disk storage, etc.) may vary between nodes of the clusters. See the HPC Resources page for an overview. To get an overview of the nodes and see how they are doing, login to a cluster and execute:
$ sinfo -N -l
Partitions are used by SLURM to group nodes with an identical or similar configuration. On our cluster—where nodes are identical—you should not worry about partitions. Your job will be assigned to the partition best suited for your purpose.
To manually select a partition use -p option in sbatch or salloc or in
the #SBATCH directive of your script:
Job Priorities
When you submit a batch job or request resources for interactive one, it is not necessarily started immediately. Instead, Jobs will be ordered in the queue of pending jobs based on a number of factors. The scheduler will always be looking to launch the job that is at the top of the queue. However, if your job does not require many resources, it may be launched earlier, as long as it does not delay the start of ony higher-priority job (this is known as conservative backfill).
The factors that contribute to a job’s priority can be seen by invoking the
sprio command. These factors include:
Fair-share: a number indicating how much you have been using each cluster recently. This is the most important factor, as it ensures that all users will be able to have their job started in reasonable time. You can check your current usage using
ssharecommand:$ sshare Account User RawShares NormShares EffectvUsage FairShare ---------- ---------- ---------- ----------- ------------- ---------- root 1.000000 1.000000 0.500000 physics 1 0.500000 1.000000 0.250000 physics username 1 0.125000 0.874713 0.007825
Job size: a number proportional to the quantity of computing resources the job has requested. Smaller and shorter jobs will have higher priority.
Age: a number proportional to the period of time that has elapsed since the job was submitted to the queue.
QOS: a number assigned to the requested Quality-Of-Service. See below for details.
QOS
When submitting a job you may choose a Quality-Of-Service (QOS). This allows
you to differentiate between jobs with lower versus higher priority. On dragon
you have a choice of the following QOSes:
normalYou have no idea what this QOS is about and you only want to have your computations done.
This is a default QOS and should be used most of the time. Within this QOS you can run jobs up to 10 days long and consuming up to 108 CPUs.
tinyYou could have used your laptop for the job, but you have no battery left.
This QOS is designed for small jobs. Jobs are limited to four CPU, 5GB RAM and can last only for 60 minutes. It should be used for draft calculations or new code compilation. Because such small jobs should not delay other ones significantly, they have increased priority.
urgentYou had to submit your PhD thesis or conference abstract yesterday, ooops.
We know how science works and planning can be hard when you expect the unexpected, so we will try to accommodate your request for this panic mode QOS. However, this is kind of disruptive for others who try to schedule their “science as usual”. Hence the following rules apply:
Your job gets a tremendous priority boost. You are almost guaranteed to jump ahead of any other job waiting in the queue.
Your fair-share factor is charged 10 times the amount of (normalized) resources as compared to when using
normalortinyQOS. Because of this penalty, your other jobs will have to wait longer than usual for their turn. This includes jobs in theurgentQOS, so submitting many job into it is pointless.If we notice that you use this QOS more often than once in a blue moon, you will be blocked from using it. This can be exempt only if you buy all cluster administrators (Maciej and Piotr at the present time) a beer, a cake, or a beverage of their choice.
longSometimes getting what you want can take a long time.
This QOS is designed for long running jobs (up to 28 days). It has a reduced priority and one user can setup 72 CPUs in this queue. But you can start your job and go for a vacation in Spain. Just remember to buy each server administrator a bottle of good wine (why it never happened?).
freeYou are a cheapskate and decided to go Dutch.
You’ll consume whatever resources are available and will accept lowest priority for your jobs. There are not limits for your job other than physical cluster capabilities and even better, your fair-share factor is not affected. In other words, you can do any computations free of charge.
The downside is that this QOS has so low priority that your job can be killed any time (this is called job preemption). You must consider this possibility, by writing your partial results to disk often and designing your code such way that it can be resume from the last saved state when restarted. When your job is preempted, it will be automatically requeued and restarted once the resources are available again.
It may take some time for this research project to complete, but hey you got it for free!
To specify a QOS when submitting a job with sbatch of salloc, use
--qos= switch either in the command line or the #SBATCH declaration.
Checking the Status of Your Job
To check the status of your job, use the squeue command.
$ squeue
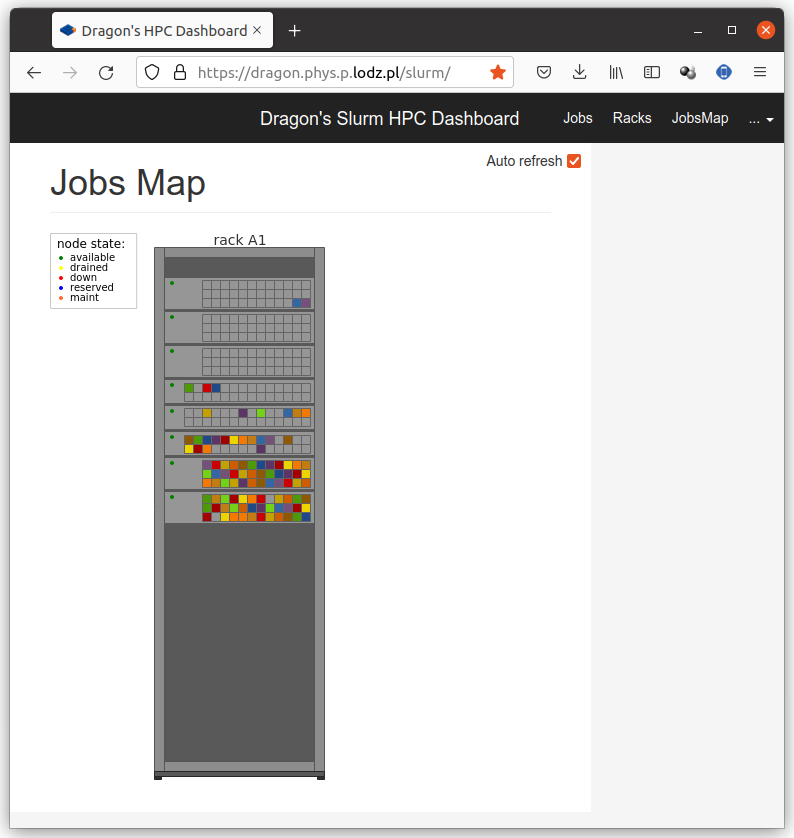
Fig 3: Cluster activity shown on browser page /slurm.
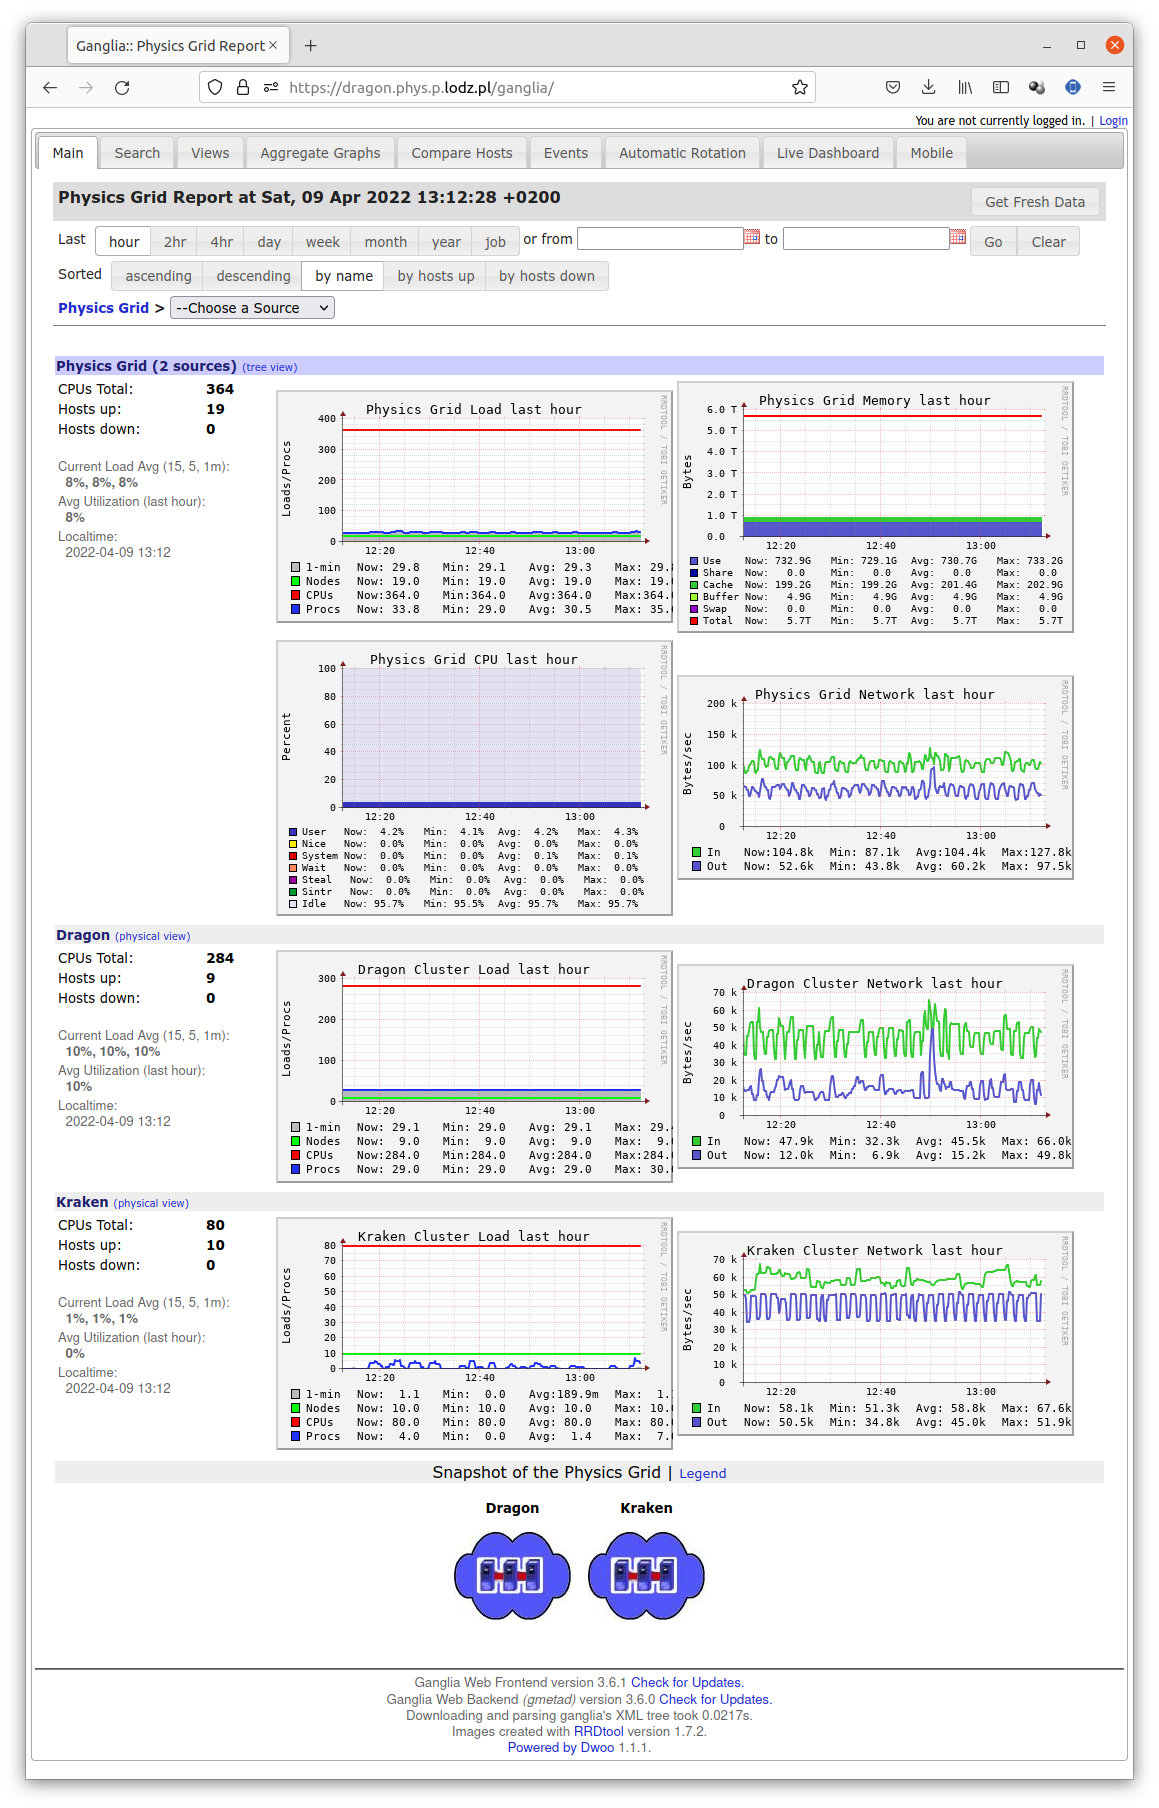
Fig 4: Complex information offered by page /ganglia.
Most common arguments to are -u username for listing only user username
jobs, and -j jobid for listing job specified by the job number. Adding
-l (for “long” output) gives more details.
Alternatively, you can use the sacct command. This command accesses the
accounting database and can give useful info about current and past job
resources usage. To get job stats for your own jobs that for example started
after 2017-04-14 11:00:00 and finished before 2017-04-14 23:59:59:
$ sacct -S 2017-04-14T11:00:00 -E 2017-04-14T23:59:59
To get job stats for a specific job:
$ sacct -j 1234
Deleting jobs
The scancel command aborts a job removing it from the queue or killing
the job’s processes if it already started:
$ scancel 1234
Deleting all your jobs in one go:
$ scancel -u username
Environment Variables Available to Execution Scripts
In your scripts you can use a number of environmental variables, which are automatically set by SLURM. The most useful ones are listed below:
Variable Name |
Description |
|---|---|
|
Total number of tasks in a job array. |
|
Job array ID (index) number. |
|
Job array’s maximum ID (index) number. |
|
Job array’s minimum ID (index) number. |
|
Job array’s index step size. |
|
Job array’s master job ID number. |
|
Name of the cluster on which the job is executing. |
|
Number of CPUS on the allocated node. |
|
Number of cpus requested per task. Only set if the
|
|
The ID of the job allocation. |
|
Count of processors available to the job on this node. |
|
Set to value of the Job Dependencies option. |
|
Name of the job. |
|
List of nodes allocated to the job. |
|
Total number of nodes in the job’s resource allocation. |
|
Name of the partition in which the job is running. |
|
Quality-Of–Service (QOS) of the job allocation. |
|
Same as |
|
Same as |
|
ID of the nodes allocated. |
|
Same as |
|
The MPI rank (or relative process ID) of the current process |
|
If the job has been restarted due to system failure or has been explicitly requeued, this will be sent to the number of times the job has been restarted. |
|
The directory from which sbatch was invoked. |
|
The hostname of the computer from which sbatch was invoked. |
|
Number of tasks to be initiated on each node. Values
are comma separated and in the same order as
|
|
The process ID of the task being started. |
|
Name of the node running the job script. |
Job Arrays
To submit a large number of similar cluster jobs, there are two basic approaches. A shell script can be used to repeatedly call sbatch passing in a customized SLURM script.
The preferred approach–that is simpler and potentially more powerful–would be to submit a job array using one SLURM script and a single call to sbatch. Job arrays hand-off the management of large numbers of similar jobs to the Resource Manager and Scheduler and provide a mechanism that allows cluster users to reference an entire set of jobs as though it were a single cluster job.
Submitting Job Arrays
Job arrays are submitted by including the -a or --array option in a call to
sbatch, or by including the #SBATCH -a command in your SLURM script.
The -a option takes a comma-delimited list of job ID numbers or of one or
more pairs of job ID numbers separated by a dash.
Each job in the job array will be launched with the same SLURM script and in
an identical environment–except for the value of its array ID. The value of
the Array ID for each job in a Job Array is stored in the
SLURM_ARRAY_TASK_ID environment variable.
For example, if a job array is submitted with 10 elements, numbered from 1 to 10, the submission command would be the following:
$ sbatch -a 1-10 array_script.sh
You may also specify explicit array indices separated by commas of add a step
to the specified range, using “:”. Hence, the following commands are equivalent:
$ sbatch --array 0-20:4 array_script.sh
$ sbatch -a 0,4,8,12,16,20 array_script.sh
An optional parameter, the slot limit, can be added to the end of the -a
option to specify the maximum number of job array elements that can run at one
time. The slot limit is specified by appending a “%” to the -a option
followed by the slot limit value. A twelve element job array with
non-sequential array IDs and a slot limit of 3 could be specified as follows:
$ sbatch -a 1-3,5-7,9-11,13-15%3 array_script.sh
Each job included in the job array has its own unique array element value
stored in the SLURM_ARRAY_TASK_ID environment variable. The value of each
job array element’s array ID can be accessed by the job script just like any
other shell environment variable. If the job ran a bash shell script, the
job’s array ID information could printed to STDOUT using the following
command:
echo "Current job array element's Array ID: ${SLURM_ARRAY_TASK_ID}"
Customizing Data for Job Array Elements
A more useful task for the array ID–and the real power of job arrays–would be to use the job’s Array ID as a direct or indirect index into the data being processed by the job array.
One approach to accomplish this would be to use the SLURM_ARRAY_TASK_ID
value to provide a custom set of input parameters for job in the job array. To
do this, a text file would be created containing multiple lines each of which
would consist of a series of space delimited values. In this approach, each
line in the data file would contain the input parameters needed by one element
of the job array. The SLURM script would then be modified to include a command
that would read in the correct line of the data file–based on the
SLURM_ARRAY_TASK_ID value of that particular job. While there are many
ways to read the appropriate line from the data file, the following serves as
a sample implementation assuming that the data file was called data.dat and
was located in the same directory as the script that was run for each element
of the job array:
PARAMETERS=$(sed "${SLURM_ARRAY_TASK_ID}q;d" data.dat)
Assuming that the executable program/script for the jobs in this array was
called command.sh, the SLURM script would launch the program with a line
like the following:
./command.sh ${PARAMETERS}
An alternate approach is possible if the unique input parameters needed by
each job in the array can be calculated arithmetically. For example, if each
instance of the command.sh script needed to loop over a range of values,
the SLURM script could calculate the max and min values needed for each job
directly–based on the value in the SLURM_ARRAY_TASK_ID environment
variable. If each job’s range needed to include 1000 values, this could be
done by including commands like the following in the SLURM script:
MAX=$(echo "${SLURM_ARRAY_TASK_ID}*1000" | bc)
MIN=$(echo "(${SLURM_ARRAY_TASK_ID}-1)*1000" | bc)
The data file referred to above (data.dat) would not be needed in this
approach, and the SLURM script call to command.sh would be something like
the following:
./command.sh ${MIN} ${MAX}
Job Dependencies
Sometimes it is useful to make a job dependent on another job. Job
dependencies are used to defer the start of a job until the specified
dependencies have been satisfied. They are specified with the --dependency
(-d for shoer) option to the sbatch command line or #SBATCH
directive.
$ sbatch --dependency=<type:job_id[:job_id][,type:job_id[:job_id]]> ...
There are the following dependency types:
Dependency |
Description |
|---|---|
|
job can begin after the specified jobs have started |
|
job can begin after the specified jobs have terminated |
|
job can begin after the specified jobs have failed |
|
job can begin after the specified jobs have run to completion with an exit code of zero |
|
jobs can begin execution after all previously launched jobs with the same name and user have ended. This is useful to collate results of a swarm or to send a notification at the end of a swarm. |
To set up pipelines using job dependencies the most useful types are
afterany, afterok and singleton. The simplest way is to use the
afterok dependency for single consecutive jobs. For example:
$ sbatch job1.sh
12345
$ sbatch --dependency=afterok:12345 job2.sh
Now when job1 ends with an exit code of zero, job2 will become
eligible for scheduling. However, if job1 fails (ends with a non-zero exit
code), job2 will not be scheduled but will remain in the queue and needs
to be canceled manually.
As an alternative, the afterany dependency can be used and checking for
successful execution of the prerequisites can be done in the job script itself.
Running MPI Jobs
MPI jobs are natively supported by SLURM. On both clusters two MPI flavours are available: MPICH and OpenMPI. You can select one of them by loading the proper module, using one of the following commands:
$ module add openmpi
or
$ module add mpich
The recommended way of launching applications differ depending on the chosen
MPI flavour. If you are using OpenMPI, you should use mpirun in your batch
script or interactive shell. For MPICH, you can simply launch your application
with srun command. In either case, you need not manually specify the
number of processes nor the nodes. This information is automatically provided
by SLURM, depending on the number of allocated tasks.
Examples:
#!/bin/bash
#SBATCH -n 8
#SBATCH --time=1:00:00
#SBATCH --mem=2G
#SBATCH --qos=normal
module add openmpi
mpirun my_openmpi_application
#!/bin/bash
#SBATCH -n 8
#SBATCH --time=1:00:00
#SBATCH --mem=2G
#SBATCH --qos=normal
module add mpich
srun my_mpich_application
Basic SLURM Commands
Action |
Command |
|---|---|
Job submission |
|
Job deletion |
|
List all jobs in queue |
|
List all nodes |
|
Show information about nodes |
|
Job start time |
|
Job information |
|
Most Common Environmental Variables
Description |
Variable |
|---|---|
Job ID |
|
Submit directory |
|
Submit Host |
|
Node List |
|
Job Array Index |
|
Job Specification
Description |
Directive |
|---|---|
Script directive |
|
Queue |
|
Wall Clock Limit |
|
Standard Output File |
|
Standard Error File |
|
Combine stdout/err |
(use |
Event Notification |
|
Email Address |
|
Job Name |
|
Job Restart |
|
Memory Size |
|
Node Count |
|
CPU Count |
|
Job Dependency |
|
Job Arrays |
|
Generic Resources |
|